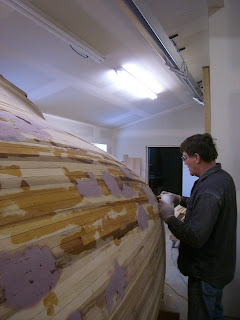
December was mostly spent in fairing (smoothing and shaping) the hull, and cleaning the inside of excess epoxy.

Pencil marks were spread across the hull. As the fairing progressed, removing any high spots, the marks disappeared.
The Festool Rotex was the original tool used. It is an aggressive cutter. It has a 6" disc and is a combo rotary and random orbit sander. It worked best for cutting down the high areas of epoxy, and later for aggressively cleaning up the inside.
The Hutchins Eliminator with it's 8" disc, is a rotary sander that blends high and low areas the best.
An inline sander was applied to a "fairing board". It will be used in an attempt to create the "ultimate smooth" for the pre-glass finish.

After smoothing the high spots, any low spots were filled with a mixture of phenolic micro spheres, wood flour and epoxy. The wood flour is for non-sag structure, while the micro spheres make the sanding easier once it has dried.

Richard dons his Tyvek (AKA sperm suit) with his 3M Breathe Easy self contained positive pressure hood for the sanding jobs. Cedar and epoxy dust are a bad combo.
The process involved frequent sweat breaks.
A more tedious job than the planking....
After the highs and lows were smoothed, a mixture of epoxy and wood flour was used to fill all screw holes and other voids.
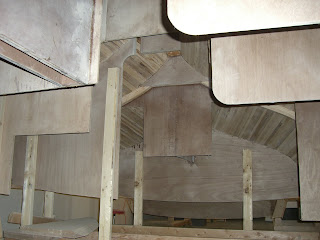
The inside was cleaned up with the aggressive Festool Rotex. I finally climbed inside to view the job. The pressurized hood was an absolute must for this job.
The laminated frames and bulkheads as structural supports are clear.
This is the view looking up toward the engine compartment and lazarettes.
The holes are baffles between the water storage compartments under the sole. All surfaces, hole interiors, etc will be meticulously glassed and epoxied. No water will be allowed to touch any wood. The center board configuration makes drainage of bilges and water compartments slightly more complicated, as there is no right to left connection or central bilge. Since numerous bilge and water pumps will be necessary, we will look at it as bilge and water pump redundancy...

The centerboard box meets up with the bulkhead to form the back of the galley sink cabinet.

The plan for the bulkheads is to cover them with white painted bead board and trim in mahogany, for a very traditional, light look. Most of the "walls" will be covered by cabinetry.

The centerboard box meets up with the bulkhead to form the back of the galley sink cabinet.

The plan for the bulkheads is to cover them with white painted bead board and trim in mahogany, for a very traditional, light look. Most of the "walls" will be covered by cabinetry.

Between these two rounded bulkheads is the Navigation Table. Note the feet working on the outside of the hull...
This is looking forward from the saloon into the storage and head area.
Here is a good view of the laminated frames that create the open area in the main saloon.
The end of the month was when the boat was made mobile for the first time!
The strong back was detached from the floor, and a series of 8 casters were placed under custom boxes. She can be moved by using a little lever action.

Now that she has her own rigidity from the planking she will be able to be pushed from side to side in the small room she inhabits. This will allow her to be positioned better for the diagonal veneer application. Next step...order the veneer.
The grand total of working hours to date is 1150 hours. That is with 13 "no work" weeks.


No comments:
Post a Comment